MyMelissa's Crafting Adventures

Wednesday, September 1, 2010

Altered Tin Picture Frame

Originally posted on November 10, 2008
Stamped images © of Stampin' UP!
NOTE:  The tinfoil background makes it hard to get a good photograph of them.
Viewing them in person allows you to view the beautiful details of the stamped image.

Centering the image... Before disassembling, I used a dry erase marker to trace just inside the opening where my image would be stamped. It comes off in a flash!

Behind the glass...

I place a piece of that pre-cut tin foil that has these little raised dots (looks like some one Cuttlebugged it with the Swiss Dots Folder). 

On the front of the glass I stamped the main image and let it dry.  I sponge daubed around the main image to the outer sides of the glass with White Staz-On. I then smooshed the glass in to some UTEE (Ultra Thick Embossing Enamel) and heat set it and then let it cool down. I used Versa Mark all over the front of the cooled image, smooshed it into the UTEE again and heat set it. As soon as the glass cooled, I assembled it and called it done! It is not completely smooth, I wanted that old time look where the glass wasn't so uniform and perfect.
Total time was probably about 15 minutes of work, not including the cool down times.

Simple, fun, easy, and oh so pretty.

Altered Tin Framed Mirror

Originally posted on November 10, 2008
Stamped images © of Stampin' UP!
 
This mirror allowed me to disassemble it... nice... I didn't have to worry about little accidents on the tin frame.

Centering the image... Before disassembling, I used a dry erase marker to trace just inside the opening where my image would be stamped. It comes off in a flash!

Directly on the mirror...

I stamped the main image and let it dry. I sponge daubed around the main image to the outer sides of the mirror with White Staz-On. I then smooshed the mirror in to some UTEE (Ultra Thick Embossing Enamel) and heat set it and then let it cool down. I used Versa Mark all over the front of the cooled image, smooshed it into the UTEE again and heat set it. As soon as the mirror cooled, I assembled it and called it done! It is not completely smooth, I wanted that old time look where the glass wasn't so uniform and perfect.

Total time was probably about 15 minutes of work, not including the cool down times.

Simple, fun, easy, and oh so pretty.

For Ron

^Front of card^
^Inside of card^
Originally posted on August 24, 2008
Stamped images © of Stampin' UP!
 
My husband requested that I make a card for his Jewish big brother's birthday... this is what I came up with.


For Mom Elaine's 65th Birthday

^Front View^
^Top View ^
Originally posted on August 21, 2008
Stamped images © of Stampin' UP!

Spring Has Sprung

Originally posted on June 2, 2008
Stamped images © of Stampin' UP!

Maureen's Baby Shower Card

Originally posted on May 24, 2008
Stamped images © of Stampin' UP!


I was asked by my boss if I had a card on hand for a baby shower. I told her I didn't, but told her I would come up with something. :o)

I went and dug out my swaps from the Anaheim Regionals and copied this baby buggy that Sue K-Miller made.

For Roger

^Roger's finished diorama card ^
^Close up of the front of the card^
^Close up of the front with a top view... see the ohhh so cute puffy clouds?^
^Left side view of the card^
^Right side view of the card^
Orgininally posted on May 9, 2008
Stamped images © of Stampin' UP!

This is my first attempt at a diorama card. Holy schnikes was it a blast! I don't think it's too bad for my first attempt... I learned that I need to be more aware of lining things up though! lol

I just purchased the 'Neighborhood' jumbo wheel, the 'Boat Loads of Love' set, and the 'Ticket Corner' punch and was itching to play with them all!

I decided to make this card for my sister's friend/co-worker who recently underwent a kidney transplant surgery (kidney donated by his 70+ year old mom. How awesome is she?) He was doing so well right after surgery that they sent him home about five days after the surgery. However, complications arose and he ended up back in the hospital. He is stable now and if he continues to respond to the medications, he will be released again sometime this weekend. Please say prayers for Roger in Tucson, AZ.

For My Mom

Originally posted on May 5, 2008 
Stamped images © of Stampin' UP!
I found the frame on clearance a few years ago and paid about $3.

I finally decided to use it for a project that I was working on for my mom. There was only a small chip in the black paint that could have been easily repaired... however, I was feeling a little over whelmed that day and beat the heck out of it with my lil hammer. It was a WONDERFUL stress reliever!

Anniversary Card for Dave

Originally posted on April 6, 2008 
Stamped images © of Stampin' UP!

For My Aunt Joyce

 Originally posted on April 6, 2008 
Stamped images © of Stampin' UP!


My Aunt Joyce has been making full sized computer generated cards for many years now.

When I went to AZ to visit for Christmas I took all my stamping goodies with me. Boy was she hooked in a matter of minutes. She absolutely loves the idea of being able to create her own backgrounds. She loves it so much...that there is a joke going around that Uncle Joe won't be able to retire in June cause she is going hog wild with purchasing stamp related things. lol

She calls often wanting to know more and more - I love it! I was teasing her a couple of weeks ago about how proud I was that she was going outside of her comfort zone (computer generated cards) to stamping her own.

Comfort zones huh? Well this got me to thinking that I was in a comfort zone with the size of cards that I make. I decided to make an Aunt Joyce sized card to see how I did. WOW... it was pretty hard for me to fill up all that space! lol

For Jonet

Originally posted on April 6, 2008 
Stamped images © of Stampin' UP!
 
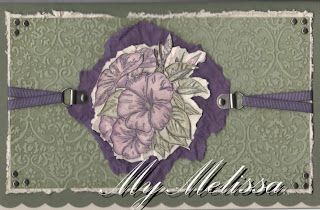
Another card cased from page 99 of the 2008 Stampin' UP! catalog.  I changed it up though.

I used the Cuttle Bug Textile embossing folder with Old Olive ink and Mellow Moss card stock. I just love how this looks like tooled leather. Man ohhhh man are the ideas still pumping after seeing how this one turned out.

The flower was stamped and colored twice, however, one was cut out and placed cock-eyed on the other flower with dimensional.

The Elegant Eggplant card stock was crumbled. I have a hard time with my hands so doing this is pretty hard sometimes. So I decided to spritz it with some water and then re-crumbled it. It was amazing how much easier it was and how much less time it took to achieve the look I wanted with the card stock being wet. I simply dried it out with my heat gun

Tuesday, August 31, 2010

Evan's Concentration Game

 April 6, 2008
Stamped images © of Stampin' UP!

My daughters class has sort of "adopted" her teacher's friend's two year old grandson, Evan, that has leukemia.  Every morning the class logs onto the computer and checks out how Evan is doing. The family has a blog set up.

He is set to do an awful lot of treatments so I thought that I would make him a little game to take with him to help pass the time.

This is a set of 20 cards that were quickly made and covered with clear contact paper so he wouldn't get any paper cuts, and that could be wiped off and disinfected if by chance that he got sick on them. The clear contact paper has also made them pretty darn sturdy.

I hope he likes them!

Thanks for looking.

P.S. If you know the name of this car and truck stamp set, please let me know. I received this set from my sister-in-law and she has no idea of the name of the set, nor when she bought it. Thanks.

Blossoms Abound for Genie - Cased Card


Original post date was April 6, 2008
Stamped images © of Stampin' UP!

I soooooooo cased this card from page 99 of the 2008 Stampin' UP! catalog. I changed it up just a hair though. It's for one of my co-workers whose 90 year old aunt just passed away.

The mellow moss dotted cardstock... the embossed dots were created using the mat pack and my Crop-A-Dile, not a task that I will use in abundance like this again!

Blossoms Abound Stamp Set

 Originally posted on April 6, 2008
Stamped images © of Stampin' UP!
I was playing around with my new stamp set and started thinking about how much this stamp looked like a "weeping willow" type of tree. This is what I came up with.

I just love these sets...they're so versatile!